Setting up a greens mower
Setting up a greens mower

Although there are many greens mowers available on the market I shall concentrate on the Toro Flex 21" because that is the machine used here at the Celtic Manor Resort, but most things you read here can be used on any fine turf machine, the basic rules are the same.
The Greens Master Flex 21" is a fine turf mower with eleven blades made of high carbon steel as standard, the bedknife is also high carbon steel with thirteen fixing points to hold the bedknife rigidly with little or no vibration even on the thinnest micro blade.
As with any other roller driven machine the clip rate is fixed, in this case its .16 inches but can be altered by using a clip kit to speed up or slow down the reel speed.
Before making any adjustments you must have certain information, the most basic of which is, what is the desired height of cut? Normally you are told what it is but sometimes you must make a guess at it, a green that is usually cut using a Greens Master 1000 will require a different height of cut when using a Flex 21" even though the clip rate is exactly the same, a guess is as near as you can get because there are many variables involved. The chief difference is the machine weight, that is a fixed difference, the rollers used on the front will make a difference as will the smaller grass basket on the Flex 21" compared to the Greens master 1000, the boxes are also mounted differently and this affects weight distribution. I won't go into grass density and length of grass but these are two important factors. There may still be adjustments to make at the green if initial adjustments are unsatisfactory.
Available Front Rollers: ~
A narrow spaced wiehle roller is recommended for normal/routine greens mowing.
The wide spaced wiehle roller is used when the turf is very dense to achieve lower effective heights of cut. This roller may also be used for higher heights on tops of tees and/or surrounds (aprons).
The full roller (solid) is recommended if the greens are damaged or stressed through extremes of temperature, humidity or excessive traffic.
Clip Kit Recommendations: ~
The clip kit consists of a pulley that allows you to speed up or slow down the reel, this will alter the clip rate or frequency. The standard clip rate is .16 inches (the same as the Greens master 1000). The clip rate can be reduced to .14 inches or increased to .21 inches.
If you cut below .100 of an inch (2.5 mm) the clip kit will enhance the quality of cut by reducing the clip rate to .14 inches. In other words the reel will go faster.
If you cut above .100 inches the standard clip rate is recommended.
The larger clip rate of .21 inches makes the 11-blade Flex 21" cut similar to the optional 8-blade reel. This will make the reel slower and may be used on tops of tees and/or surrounds (aprons).
Rear Roller Position Recommendations.
With the Flex 21" you have the ability to alter the angle of the bedknife to the turf (known as attitude) by adjusting the rear roller height. (Not an option on the Greens master 1000).
This is achieved by adjusting the bracket figure 1 item 1.
Figure 1.
1.
1. Rear roller bracket.
2. Height of cut arm.
3. Lock nut.
4. Adjusting screw.
Cutting heights from .062-.187 inches (1.6 mm-4.76 mm) is position 1 the bracket is all the way to the top.
Cutting heights from .125-.296 inches (3.2 mm-7.5 mm) is position 2 the bracket is lower by one hole.
The optimal cut off point is .156 inches (3.95 mm).
After making any adjustment to the rear roller it must be re-levelled.
Adjusting the roller will be explained later.
Bedknife Recommendations.
There is a large selection of bedknives available for the Flex 21" and this may lead to some confusion. Toro manufacture a range of extended bedknives and standard bedknives, which adds to the issue of when to use which bedknife.
Lets look at these one at a time: ~
If you cut below 1/8 inches (3.2mm) use a micro-cut bedknife (standard).
If you cut above 1/8 inches (3.2mm) use a tournament bedknife (standard).
If you cut at higher heights of cut a low-cut blade can be used to extend the frequency of blade changes.
Most of the problems of marking on a golf green, such as scalping, washboading, ruffling and bruising come at lower heights of cut, therefore the machine must be configured to prevent these things happening.
The extended bedknives will help to prevent bruising, scalping and ruffling and come in micro-cut (part no. 104~7720) for heights of cut below 1/8 inches and tournament (part no. 99~4299) for heights of cut above 1/8 inches.
The extended bedknife was developed to make the mower less aggressive and to help resolve bruising and scalping issues, this is achieved by moving the cutting edge forward by 3/16 inches.
Levelling the Rear Roller to the Reel.
1. Position the unit on a flat steel level surface (we use the grinder table).
2. Place a ¼ inch flat bar under the reel blades and against the front edge of the bedknife. (There must be three reel blades in contact with the flat bar).
3. Firmly press down on the unit and maintain pressure on the rear roller. Try and inset a piece of paper between the rear roller and the flat surface. If there is a gap at one end of the roller an adjustment is required.
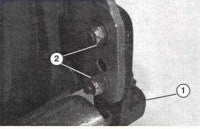
4. Loosen the locknuts securing the right hand roller bracket to the unit side plate.
Fig 2.

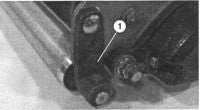
5. Press down on the unit so that the rear roller and the reel maintain contact with the flat plate. Loosen the locknuts on the rear-mounting bracket and rotate the right hand lower bolt. This bolt has an offset shoulder and will act as an eccentric (cam) to raise or lower the rear roller. There is an I.D. dot, which identifies the offset bolt; the dot should always be in the rearmost half of the arc as shown in the picture.
Fig 3

Note: ~ If additional adjustment is required, replace the screw on the left hand side with another eccentric bolt, Part No. 105~3833.
6. Verify the roller is level by trying to insert a piece of paper between the rear roller and the plate, if the roller is level this should not be possible.
Adjusting the bedknife to the reel.
Note: ~Bedknife to reel adjustment is carried out before height adjustments are made.
1. Position machine on a flat, level work surface and remove reel/bedknife contact by turning the adjusters anti-clockwise.
2. Tilt the mower backwards to expose the reel and bedknife.
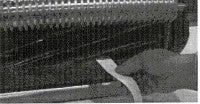
3. At one end of reel insert a strip of dry paper, (we use photocopy waste paper) as shown in the picture.
Fig 4

Rotate reel and turn adjuster clock-wise (on same end of reel) one click at a time until the reel pinches the paper. (1 click = .0007 inches).
4. Check for light contact at the other end of the reel using the dry paper and adjust as required.
5. After adjustment has been carried out, check to see if the reel pinches the paper when inserted from the front parallel to the reel, but cuts cleanly when inserted at a right angle.
Note: ~ Should there be excessive reel drag (contact) it will be necessary to regrind the cutting unit until the blades are sharp enough for precision cutting.
Adjusting the Height of Cut (HOC).
1. Check front and rear roller bearings, replace or adjust as required. This will affect the HOC.
2. Check reel bearings, replace or adjust as required. This will affect the quality of cut.
3. Adjust the rear roller brackets to upper or lower position depending on the height of cut range required.
q The upper position is used when HOC settings range from 1/16 inches to 5/32 inches.
q The lower position is used when the HOC settings range from 1/8 inches to 19/64 inches.
4. Verify that the rear roller is level by carrying out the procedure as outlined in Levelling Rear Roller to Reel.
5. Tip mower backwards to expose the reel/bedknife and front & rear rollers.
6. Loosen the locknuts securing the height of cut arms to the cutting unit side plates.
Fig 5

1. Rear roller bracket 3. Locknut.
2. HOC arm. 4. Adjusting screw.
7. Take the HOC gauge and place the head of the slide beneath the tip of the bedknife ensuring the flat of the gauge is firmly against the front and rear rollers. (The rollers must be clean, as this will affect the HOC).
8. Read from the Dial Test Indicator (DTI) the amount of whole millimetres and from the larger needle the 100th. Millimetres.
9. Turn the knobs in the required direction. (Clockwise for lowering and anticlockwise to increase the HOC). This may have to be done several times to get the desired HOC.
10.When this is achieved tighten the locknuts on the adjusting knobs.
Adjusting the Cut-Off Bar.
The cut-off bar needs to be adjusted correctly to minimise the loss of clippings.
1. Loosen the screws securing the cut-off bar to the unit.
2. Insert a .060 inches feeler gauge between top of reel and cut-off bar.
3. Move cut off bar to meet the gauge and retighten the screws.
Stick to these procedures and your machine(s) should be trouble free.
The above notes are extracted from the Celtic Manor Resort Cross Training book for Green keepers and may be of some interest to new users of the Toro Greens Master Flex 21" pedestrian mower.
